介绍
HA有一个内置的认证系统,允许不同的用户与其交互。认证系统由多个部分组成:
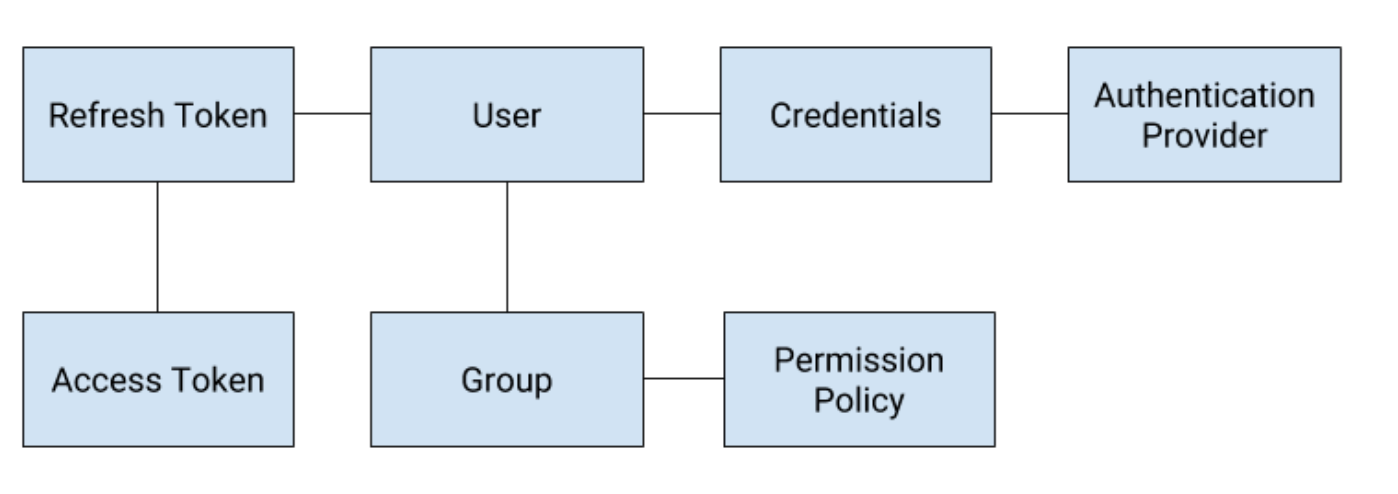
身份认证提供者(authentication providers)
身份验证提供者用于用户对自己进行身份验证。由身份验证提供者选择要使用的身份验证方法和后端。默认情况下,我们启用内置的HA身份验证提供程序,它将用户安全地存储在配置目录中。
HA将使用的身份验证提供程序在configuration.yaml中指定。可以激活同一个身份验证提供者的多个实例。在这种情况下,每个都将由一个惟一的标识符标识。相同类型的身份验证提供者不会共享凭据。
Credentials(证书、凭据)
凭据使用特定的身份验证提供者存储用户的身份验证。它是在用户成功通过身份验证时产生的。它将允许系统在我们的系统中找到用户。如果该用户不存在,将创建一个新用户。该用户将不会被激活,但将需要得到所有者的批准。
用户可以有多个凭据链接到它本身(即用户)。但是,每个特定的身份验证提供者只能有一个凭据。
用户
每个人都是系统中的一个用户。要作为特定用户登录,请使用链接到该用户的任一身份验证提供者进行身份验证。当用户登录时,它将获得一个刷新(refresh token)和一个访问(access token)令牌,以向Home Assistant发出请求。
拥有者(owner)
在onboarding期间创建的用户将被标记为“所有者”。所有者能够管理其他用户,并且总是能够访问所有权限。
组
用户是一个或多个组的成员。组成员关系是授予用户权限的方式。
权限策略(Permission Policy)
权限策略描述了一个组可以访问哪些资源。有关权限和策略的更多信息,请参见权限。
refresh and access token
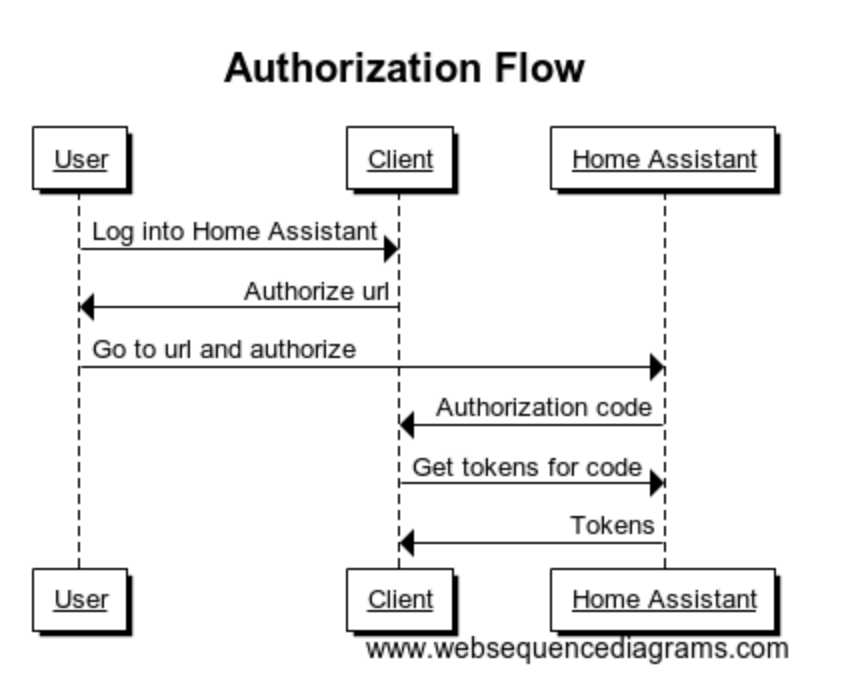
希望访问Home Assistant的应用程序将要求用户启动授权流。当用户使用Home Assistant成功授权应用程序时,该流将生成授权码(authorization code)。此码可用于获取访问(access token)和刷新(refresh token)令牌。访问令牌(access token)将有一个有限的生存期,而刷新令牌 (refresh token)将保持有效,直到用户删除它。
访问令牌用于访问Home Assistant api。刷新令牌用于检索新的有效访问令牌。
refresh token 类型
- 正常,这些是用户授权应用程序时生成的令牌。应用程序将代表用户保留这些令牌;
- 长期存活的access token,这些是支持长期生存访问令牌的刷新令牌。它们是在内部创建的,从不向用户公开;
- 系统,这些令牌只能由Home Assistant OS和Supervisor等系统用户生成和使用。它们永远不会暴露给用户。
权限(permissions)
这是一个实验性的特性,还没有启用或实施
权限限制用户可以访问或控制的内容。权限被附加到组,用户可以是组的成员。用户所属的所有组的组合权限决定了用户可以看到什么,不能看到什么或控制什么。
权限不适用于标记为“所有者”的用户。这个用户将始终能够访问所有内容。
普通权限结构
策略是一种字典,在根级别由不同类别的权限组成。在当前的实现中,这仅限于实体。
1 | { |
每个类别可以进一步细分为描述该类别部分的子类别。
1 | { |
如果省略了某个类别,用户将没有该类别的权限。
定义策略时,任何位置的任何字典值都可以用True或None替换。True表示授予权限,None表示使用default,即拒绝访问。
实体(Entities)
实体权限可以使用子类别entity_ids、device_ids、area_ids和domain在每个实体和域的基础上设置。您可以通过设置值为True授予所有访问权限,或者您可以使用“读”、“控制”、“编辑”权限单独指定每个实体。
系统将根据顺序返回第一个匹配结果:entity_ids、device_ids、area_ids、domains、all。
1 | { |
合并策略
如果用户是多个组的成员,组权限策略将在运行时组合为单个策略。当合并策略时,我们将查看字典的每一层,并使用以下方法比较每个源的值:
- 如果其中任何一个值为True,则合并后的值为True;
- 如果有任何值是字典,则合并的值将成为使用此方法递归检查每个值而创建的字典;
- 如果所有值都为None,则合并后的值为None;
示例:
1 | { |
检测权限
我们目前有两种不同的权限检查:用户是否可以对一个实体进行读取/控制/编辑操作,以及用户是admin,因此允许更改这个配置设置。
所有用户都可以访问某些api,但可能会根据权限提供有限的作用域,比如呈现模板。
检测权限
要检查权限,您需要拥有对用户对象的访问权限。一旦您拥有了用户对象,检查权限就很容易了。
1 | from homeassistant.exceptions import Unauthorized |
context对象
Home Assistant中的所有服务调用、触发的事件和状态都有一个上下文对象(context)。该对象允许我们将更改属性设置为事件和服务。这些上下文对象还包含一个用户id,用于检查权限。
对于权限检查来说,代表用户执行的操作是使用包含用户ID的上下文完成的,这一点至关重要。如果您处于服务处理程序(service handler)中,则应该重用传入上下文call.context。如果你是在WebSocket API或Rest API端点,你应该创建一个正确的用户上下文:
1 | from homeassistant.core import Context |
如果一个权限校验失败
当您检测到未经授权的操作时,您应该引发homeassistant.exceptions.Unauthorized异常。此异常将取消当前操作,并通知用户他们的操作是未授权的。
Unauthorized异常有各种参数,用来识别权限检查失败。所有字段都是可选的。
不是所有的动作都有一个ID(像添加config entry),然后我们使用这个fallback来知道哪些类别是unauth
| 参数 | 描述 |
|---|---|
| context | The context of the current call |
| user_id | The user ID that we tried to operate on. |
| entity_id | The entity ID that we tried to operate on. |
| config_entry_id | The config entry ID that we tried to operate on. |
| perm_category | The permission category that we tested. Only necessary if we don’t have an object ID that the user tried to operate on (like when we create a config entry). |
| permission | The permission that we tested, ie POLICY_READ |
保护服务调用处理程序
服务调用允许用户控制实体或将其集成为一个整体。服务调用使用附加的上下文来查看是哪个用户调用了该命令。因为使用了上下文,所以将调用上下文传递给所有服务调用是很重要的。
所有通过实体组件(component.async_register_entity_service())注册的服务将自动检查其权限。
检查实体的权限
您的服务调用处理程序将需要检查它将操作的每个实体的权限。
1 | from homeassistant.exceptions import Unauthorized, UnknownUser |
检查admin权限
从Home Assistant 0.90开始,有一个特殊的装饰器来帮助保护需要管理员访问权限的服务。
1 | # New in Home Assistant 0.90 |
保护REST API端点
1 | from homeassistant.core import Context |
保护websocket api
验证Websocket API端点的权限可以通过connection.user访问用户来完成。如果需要检查管理员访问权限,可以使用内置的@require_admin装饰器。
1 | from homeassistant.components import websocket_api |
API
认证API
此页面将描述应用程序授权和集成Home Assistant实例所需的步骤。查看由我们的助手库home-assistant-js-websocket提供的演示。
每个用户都有自己的Home Assistant实例,它让每个用户可以控制自己的数据。然而,我们也想让第三方开发者更容易创建允许用户与Home Assistant集成的应用程序。为了实现这一点,我们采用了OAuth 2规范和OAuth 2 IndieAuth扩展来生成客户端。
客户端
在要求用户使用应用程序授权其实例之前,您将需要一个客户端。在传统的OAuth2中,服务器需要生成一个客户端,然后用户才能授权。但是,由于每个服务器都属于一个用户,所以我们采用了与IndieAuth稍有不同的方法。
您需要使用的客户端ID是您的应用程序的网站。重定向url必须与客户端ID具有相同的主机和端口。例如:
如果你需要一个不同的重定向url(例如,如果构建一个本地应用程序),你可以添加一个HTML标签到你的应用程序的网站内容(客户端ID)与一个批准的重定向url。例如,将此添加到您的站点的白名单重定向uri hass:
1 | <link rel='redirect_uri' href='hass://auth'> |
HA将扫描网站的前10kB链接标签.
认证
授权url(authorize url)应该包含client_id和redirect_uri作为查询参数。
1 | http://your-instance.com/auth/authorize? |
您还可以选择包含一个state参数,它将被添加到重定向uri中。该状态非常适合存储您正在进行身份验证的实例url。例子:
1 | http://your-instance.com/auth/authorize? |
用户将导航到这个链接,并看到登录和授权应用程序的说明。一旦授权,用户将被重定向回传入的重定向uri,授权代码和状态将作为查询参数的一部分。例子:
1 | https://hass-auth-demo.glitch.me/auth_callback |
可以通过将此授权代码发送到令牌端点(token endpoint)来交换令牌(请参阅下一节)。
token
token端点返回给定有效授权的令牌。此授予是从授权端点检索到的授权代码或刷新令牌。对于刷新令牌,令牌端点也能够撤销令牌。
与该端点的所有交互都需要是发送到http://your-instance.com/auth/token的HTTP POST请求,请求体编码为application/x-www-form-urlencoded。
Authorization code(授权码)
到令牌端点的所有请求都需要包含用于将用户重定向到授权端点的完全相同的客户端ID。
在用户成功完成授权步骤后,使用授权类型authorization_code检索令牌。请求体是:
1 | grant_type=authorization_code& |
返回响应将是一个访问和刷新令牌:
1 | { |
访问令牌是一个短期存在的令牌,可用于访问API。可以使用刷新令牌来获取新的访问令牌。expires_in值是访问令牌有效的秒数。
如果发出了无效的请求,将返回HTTP状态码400。如果请求不活动用户的令牌,则HTTP状态码为403。
1 | { |
refresh token
通过授权类型authorization_code检索到刷新令牌后,就可以使用它来获取新的访问令牌。请求体是:
1 | grant_type=refresh_token& |
响应
1 | { |
如果发出了无效的请求,将返回HTTP状态码400。
1 | { |
Revoking a refresh token
Client_id不再需要
令牌端点还能够撤销刷新令牌。撤销一个刷新令牌将立即撤销刷新令牌和它曾经授予的所有访问令牌。要撤销刷新令牌,请执行以下请求:
1 | token=IJKLMNOPQRST& |
无论请求是否成功,请求将始终以空体和HTTP状态200进行响应。
Long-lived access token
长寿命访问令牌的有效期为10年。这些对于集成第三方api和webhook风格的集成非常有用。长期访问令牌可以使用用户的家庭助理配置文件页面底部的“长期访问令牌”部分创建。
您还可以使用websocket命令auth/long_lived_access_token生成一个长期生存的访问令牌,它将为当前用户创建一个长期生存的访问令牌。访问令牌字符串不保存在Home Assistant中;你必须把它记录在一个安全的地方。
1 | { |
响应包含一个长期存在的访问令牌:
1 | { |
Making authenticated requests
有了访问令牌后,就可以向Home Assistant api发出经过身份验证的请求。
对于websocket连接,在认证消息中传递访问令牌。
对于HTTP请求,将令牌类型和访问令牌作为授权头传递:
1 | Authorization: Bearer ABCDEFGH |
如果访问令牌不再有效,您将得到一个HTTP状态码401未授权的响应。这意味着您需要刷新令牌。如果刷新令牌不起作用,则令牌将不再有效,因此用户将不再登录。您需要清除用户的数据,并请用户重新授权。
Signed paths
有时您希望用户向Home Assistant发出GET请求以下载数据。在这种情况下,普通的认证系统不会这样做,因为我们不能将用户链接到一个带有认证头的API。在这种情况下,带符号的路径会有所帮助。
签名路径是我们服务器上的普通路径,比如/api/states,但是附带了一个安全的身份验证签名。用户能够导航到此路径,并将被授权为创建签名路径的访问令牌。经过签名的路径可以通过websocket连接创建,并且是短期的。默认的过期时间是30秒。
要获取签名路径,请发送以下命令:
1 | { |
响应
1 | { |
关于带符号的路径需要注意的一些事情:
- 如果删除刷新令牌,则签名url不再有效。
- 如果用户被删除,签名url将不再有效(因为刷新令牌将被删除)。
- 如果HA重新启动,则签名的url不再有效。
- 访问只有在接收到请求时才进行验证。如果响应时间超过了过期时间(例如,下载一个大文件),那么在过期时间过去后,下载将继续。
Authentication Providers
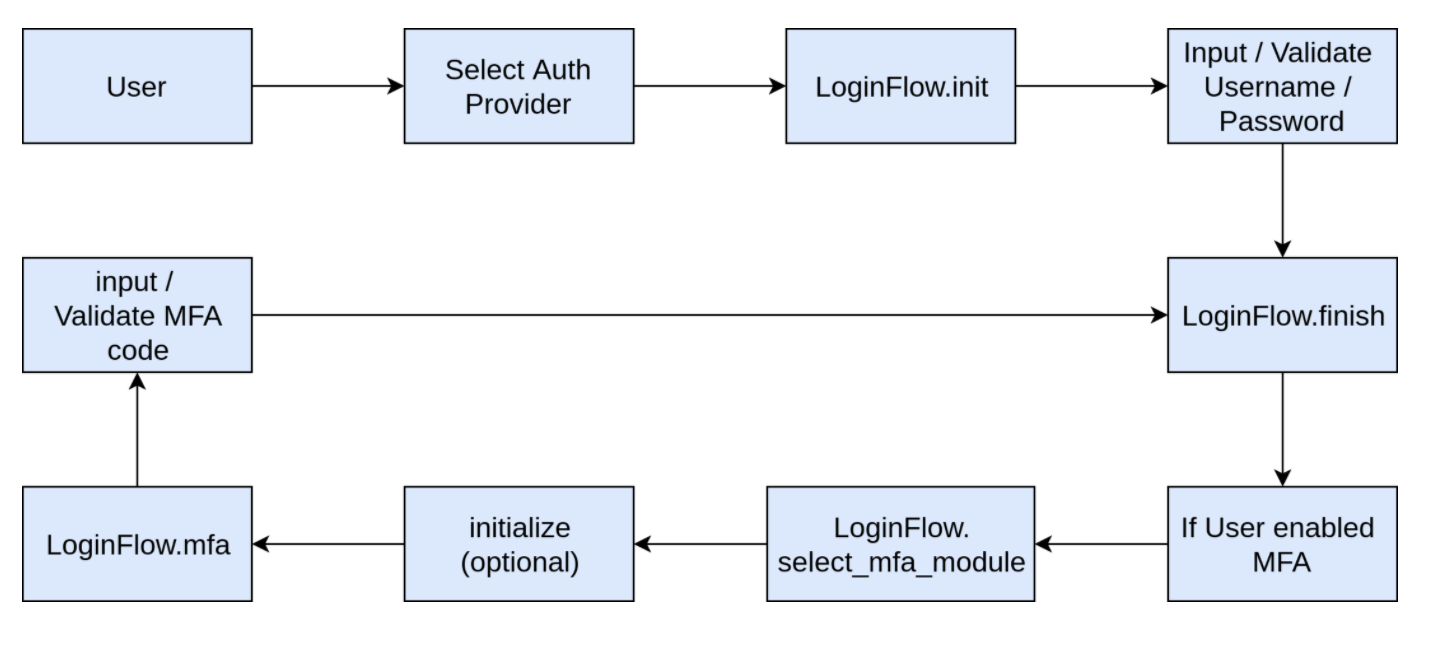
身份验证提供者确认用户的身份。用户通过登录流验证身份提供者的身份。身份验证提供者定义登录流,并可以询问用户所需的所有信息。这通常是用户名和密码,但也可能包括2FA令牌或其他挑战。
一旦身份验证提供者确认了用户的身份,它将以凭据对象的形式将其传递给Home Assistant。
定义一个auth provider
我们目前只支持内置的身份验证提供者。对自定义身份验证提供者的支持可能会在将来实现。
身份验证提供者定义在homeassistant/ Auth /providers/<提供者名称>.py中。auth提供者模块需要提供AuthProvider类和LoginFlow类的实现,它向用户询问信息,并根据data_entry_flow对其进行验证。
For an example of a fully implemented auth provider, please see insecure_example.py.
Auth providers shall extend the following methods of AuthProvider class.
| method | required | 描述 |
|---|---|---|
| async def async_login_flow(self) | 是 | Return an instance of the login flow for a user to identify itself. |
| async def async_get_or_create_credentials(self,flow_result) | 是 | Given the result of a login flow, return a credentials object. This can either be an existing one or a new one. |
| async def async_user_meta_for_credentials(credentials) | 否 | Callback called Home Assistant is going to create a user from a Credentials object. Can be used to populate extra fields for the user. |
Auth providers shall extend the following methods of LoginFlow class
| method | required | 描述 |
|---|---|---|
| async def async_step_init(self, user_input=None) | 是 | Handle the login form, see more detail in below |
async_step_init of LoginFlow
未来该方法可能胡更改
LoginFlow扩展data_entry_flow.FlowHandler。数据输入流的第一步硬编码为init,因此每个流都必须实现async_step_init方法。async_step_init的模式喜欢下面的伪代码
1 | async def async_step_init(self, user_input=None): |
Multi-factor Authentication Modules
多因素身份验证模块与身份验证提供者一起使用,以提供一个完全可配置的身份验证框架。每个MFA模块可以提供一个多因素认证功能。用户可以启用多个mfa模块,但登录过程中只能选择一个模块。
定义一个MFA
当前只支持内置的
多因素认证模块定义在homeassistant/ Auth /mfa_modules/<模块名>.py中。auth模块需要提供MultiFactorAuthModule类的实现。
有关完整实现的身份验证模块的示例,请参见insecure_example.py。
多因素认证模块应该扩展MultiFactorAuthModule类的以下方法。
| method | required | 描述 |
|---|---|---|
| @property def input_schema(self) | 是 | Return a schema defined the user input form. |
| async def async_setup_flow(self, user_id) | 是 | Return a SetupFlow to handle the setup workflow. |
| async def async_setup_user(self, user_id, setup_data) | 是 | Set up user for use this auth module. |
| async def async_depose_user(self, user_id) | 是 | Remove user information from this auth module. |
| async def async_is_user_setup(self, user_id) | 是 | Return whether user is set up. |
| async def async_validate(self, user_id, user_input) | 是 | Given a user_id and user input, return validation result. |
| async def async_initialize_login_mfa_step(self, user_id) | 否 | Will be called once before display the mfa step of login flow. This is not initialization for the MFA module but the mfa step in login flow. |
setup flow
在用户可以使用多因素身份验证模块之前,必须启用或设置该模块。所有可用的模块将列出在用户配置文件页面,用户可以启用他/她想使用的模块。设置数据输入流将指导用户完成必要的步骤。
每个MFA模块需要实现一个从mfa_modules扩展的设置流处理程序。SetupFlow(如果只需要一个简单的设置步骤,SetupFlow也可以使用)。例如,对于谷歌验证器(TOTP,基于时间的一次性密码)模块,流程将需要:
- 生成一个秘密并将其存储在设置流程的实例中
- 返回带有描述中的QR码的async_show_form(通过description_placeholders作为base64注入)
- 用户扫描代码,并输入一个代码来验证它的扫描正确和时钟同步
- TOTP模块保存的秘密连同user_id,模块为用户启用
workflow
配置示例
1 | # configuration.xml |
在这个例子中,用户将首先从homeassistant或legacy_api_password身份验证提供者中选择。对于homeassistant身份验证提供商,用户将首先输入用户名/密码,如果该用户同时启用了totp和insecure_example,则用户需要选择一个身份验证模块,然后根据选择输入谷歌身份验证码或pin码。
验证会话
与auth提供程序不同,auth模块使用session来管理验证。认证提供者验证后,mfa模块将创建一个验证会话,包括一个过期时间和来自认证提供者验证结果的user_id。多因素认证模块不仅会验证用户输入,还会验证会话是否过期。验证会话数据存储在配置目录中。